Saturday, December 12, 2009

When cookbooks lead you astray

Recently I tried the Baked Chicken, Lemon and Pea Risotto recipe from Donna Hay's "Off the Shelf."


I'm always looking for recipes I can make when I get home from work that don't require too much from me. Ours isn't a household that shares the cooking: it's just me or the lovely folks over at Mina's Thai restaurant. The spouse can make a box of mac and cheese and he does so quite willingly, but, well, you know. It's not exactly cooking (sorry sweetie... I love you...you don't cook.)

The Donna Hay caught my eye because:

  • It had gorgeous photos of all the dishes 
  • They seemed easy enough.

So on to the risotto tale. It was excellent. The leek and lemon flavors blended really nicely with the moist chunks of chicken. Also, anything I can dump in chicken stock, rice and add heat to and it tastes good? Well, I'm in. And it made a LOT of food. Which is essential in our house where the above spouse can fill his lanky frame to the brim with massive quantities of food.

The rice never got soft and risotto-y. It was al dente at best. I followed the directions. I didn't add anything or even cut a corner. And yet? Not really what Hay was suggesting it would be. We ate it. It wasn't horrible. Just resulted in us looking at each other garbling, "Crunchy!" while we munched.

Which reminds me of another cookbook-astray-leading... the Barefoot Contessa. Ina! You brilliant bitch! That turkey meatloaf recipe is divine. But it appears that you created a recipe to serve an entire army of hungry spouses rather than just the one.


Having never cooked much with ground turkey, I thought, "huh, that's a LOT of turkey in there--maybe it shrinks or something." Even the spouse was surprised at the size of the giant raw loaf going into the oven.

Ground turkey doesn't shrink.

It's just a ginormous meat loaf recipe. We had leftovers for nearly two weeks. It was the loaf that just wouldn't die. And no one wants to eat that much turkey meat loaf. Seriously.

It's hard to write a recipe that is easy to follow, easy to recreate, and that will be the right amount in your readers' expectations.

What's is easy? Selling me a book with gorgeous pictures of food. At least they've got that down!

Sunday, November 29, 2009

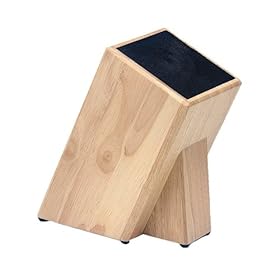
Universal Knife Block: Give Peace a Chance

A few years ago, as wedding presents, we received several very good knives. They weren't sets, but instead some very sharp individual chef's knives and a paring knife or two. Right after the wedding we moved to Tucson and into a fairly small kitchen.

My new husband was convinced he'd slice his arm off on one of those wall mounted magnetic strips, so the knives went into the drawer along with the silverware. It's annoyed me since the day they went in.

  1. You don't treat good knives like that
  2. Trying to find your favorite knife in a drawer that also contains cutlery, serving utensils, coffee filters, straws, and a one-off plastic forks and spoons is just annoying
  3. That annoyance can get dicey (get it? knife post? dicey? *sigh*) when sharp edges are involved.

Months later while wandering in a dream-like state through Williams-Sonoma (swear they put something in those free samples), after petting the KitchenAid mixers in pastel shades, and delighting in the gadget wall ... I came across a universal knife block. I remember petting it and sticking random thin objects in it at the store and feeling oh-so-happy: girl claps were used. It was genius! Hundreds of tines shoved in a block that you can nestle knife blades of all shapes, sizes, and creeds into!

But, like most swoon-worthy items at WS, the price was just too high for me at the time.

Last night I became the proud owner of the Kapoosh Universal Knife Block. Purchased at Bed Bath and Beyond for $29.95 it now sits on my counter with all my good knives in place.


The very few negative reviews on Amazon suggest that when shoving things into it, you can decimate the plastic tinage that makes the Kapoosh so awesome.  I say bring it. I'm fairly gentle with my kitchen appliances and a good dose of forewarning should be enough to keep them in good shape for at least a year. KAPOOSH!

Thursday, August 20, 2009

Mexican Chocolate Pudding — Olé!

This recipe popped into my iGoogle reader one morning, and it was difficult not to rush home to make it. It arrived in my favorite recipe feed from Mark Bittman (also @bittman on Twitter).

In this instance, he was playing with tofu. Yes, there is one pound of tofu in this dessert. I PINKIE SWEAR nobody will ever notice. And with tofu and chocolate as main ingredients, I think a strong argument can be made that this deliciousness actually is good for you.

Fair warning: Do not make this luscious dessert when you have a bunch of vultures friends visiting or your bowl will look just like mine:


Here's what it looks like when Mark makes it (with chocolate shavings, of course—Photo courtesy of The New York Times):


Equipment needed:

  • Large mixing bowl
  • Blender, whisk or spoon (even a fork would work)


  • Ingredients:

  • 3/4 cup sugar
  • 1 pound tofu (silk, I used organic firm, but soft would work better probably)
  • 8 ounces chocolate, melted
  • 1 teaspoon vanilla (I added a touch more)
  • 1 1/2 teaspoons ground cinnamon
  • 1/2 teaspoon chili powder (play with this - I use 1 teaspoon, but it's to taste)


  • What to do:
    Mix everything in a blender (or whipping it by hand also works).

    This is a very (very!) rich dessert, so it will go a long way. But I have yet to have leftovers.

    Did you play with this recipe? Make any fun alterations? Leave a comment and share with us!

    Monday, August 10, 2009

    Spicy Bean, er, Soup

    This project started out as a request from The Mate for spicy bean soup. So, I made it up. As you'll notice in the photo, mine turned out more like chili (which The Mate really loves, so that worked out). If you don't want this to happen, don't boil down the broth like I did. It's good either way.

    This spicy soup is perfect for a chilly fall meal. Of course, I made it on the hottest, muggiest day of the year (not crazy, just obsessed with food creation). No matter—it's delicious in any weather.

    And remember, soup is extraordinarily flexible. If there's an ingredient you don't like, substitute something else. Cooking is all about playing until you get it the way you want.

    Here's what mine looked like:


    Equipment needed:

    • Very large soup pot
    • Spoon to stir
    • Sharp knife to chop


    Ingredients:

    • 1 bag mixed dried beans (if it comes with a spice packet for soup, throw out that packet)
    • 1 pound chorizo (get the hot one—if it's not hot enough when you taste the soup, you can add a little cayenne to spice it up more)
    • 1 cup brown rice
    • 4 quarts water (I used 5, thus the excess boiling down and subsequent chili texture. 4 should work well—you can always add more if you like)
    • 2 tablespoons fresh, chopped oregano
    • 1 teaspoon garlic powder
    • 5 cloves garlic, chopped
    • 2 fresh bay leaves (remove before serving soup)
    • 1 small onion, chopped
    • 1 28-ounce can chopped tomatoes
    • 3-5 fresh tomatoes, chopped (or however many you have handy, any variety)
    • 1 6- or 12-ounce can tomato paste (I used 12-ounce, but 6-ounce would be fine)
    • 2 tablespoons Better Than Bouillon, chicken
    • Salt and pepper to taste


    What to do:

    Set water to boil in soup pot. While it's heating up, remove casing from chorizo, break into small bits and drop into water. Add spices, tomatoes and tomato paste. When the water boils, add Better Than Bouillon (makes it easier to dissolve). Simmer for about 30 minutes (or until the scent is strong enough to make your mouth water). Add beans and rice, stir. Simmer for about another hour, until the beans are fully cooked, stirring occasionally. If you like the consistency of the soup, simmer with a cover on the pot. If you want thicker soup, no cover.

    Serve with warm tortillas (slathered in butter if you're extra decadent) or your favorite bread.

    This should serve 6-8 people. Or you can put it in glass mason jars and freeze for a quick meal later!

    Friday, May 8, 2009

    Baked Brie and Mushrooms — 'Nuff Said

    If you want to get on the invite list for all your friends' dinner parties, bring this appetizer. It's super easy to make, but will nonetheless make you look like a rock-star chef.

    My mom-in-law, who happens to be an amazing chef, dropped her head to her hands and said, "I don't know that I'll ever be able to cook for you again."

    She was kidding. I hope.

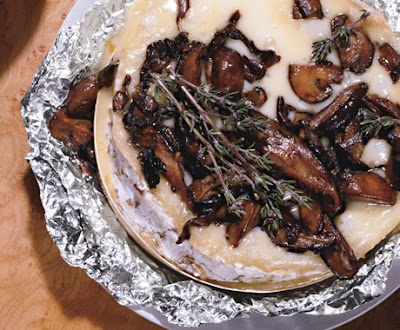
    Their dish, photo by José Picayo, Bon Appétit, March 2009:


    They totally glammed-up this photo - first, WAY more mushrooms are required and second, who leaves the thyme whole like that?

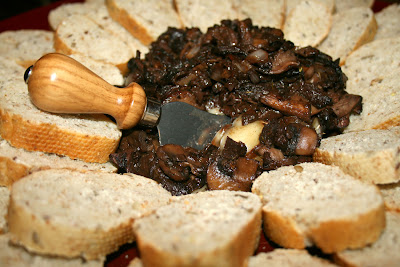
    My dish, no glam:


    Equipment needed:
    • Foil
    • Sharp chef's knife
    • Small sauce pan
    • Medium sauté pan
    • Spatula
    Ingredients:
    • 1/2 ounce dried porcini mushrooms (you should be able to find these in any grocery store produce section)
    • 2/3 cup dry red wine (use a good one for this recipe, not cooking wine)
    • 2 tablespoons (1/4 stick) butter
    • 6 ounces crimini (baby bella) mushrooms, sliced
    • 6 ounces shiitake mushrooms, stemmed, sliced
    • 2 tablespoons minced shallot (about 1 large)
    • 2 teaspoons chopped fresh thyme (SEE? Chopped)
    • 1 13- to 14-ounce Brie (about 5 inches in diameter; can also make a smaller one for two people and reduce mushrooms)
    • 1 baguette, cut into 1/4-inch-thick slices (I've tried wheat and traditional white — both worked well)
    What to do:

    Rinse dried porcini mushrooms. Combine with red wine in a small sauce pan. Bring to a simmer, then remove from heat and let soak for about 20 minutes. Strain the mushrooms, reserving the wine sauce. Roughly chop the porcini and set aside.

    Melt butter in medium sauté pan over medium-high heat. Add the crimini and shiitake mushrooms with a little salt and pepper. Sauté until brown, stirring. Add shallot and stir until soft. Add chopped porcini and strained wine. Boil until almost dry. Stir in chopped thyme and a little more salt and pepper.

    Tear two large sheets of foil and mold into a make-shift bowl, about two inches larger than the Brie wheel. Unwrap the Brie. Using a sharp chef's knife cut off the top rind (note: you can eat brie rind — don't cut it all off; it will fall apart if you do). Place Brie in the foil bowl and mound the mushroom mixture on top.

    **Note: if you're taking this to a friend's house or not ready to serve it right away, STOP RIGHT HERE. Cover it and store in the fridge until you're ready to serve it, but bring to room temperature before continuing.

    Preheat oven to 350°F. Put the Brie-mushroom bowl on a rimmed baking sheet and bake for about 15 minutes, until Brie just begins to melt (if you poke it with your finger, it will be soft and deliciously squishy).

    Transfer the heavenly dish to a platter, and serve hot with warm baguette slices.

    Friday, May 1, 2009

    Now it's Istanbul, not Constantinople

    The printing house where I worked in Frankfurt, Germany, in the mid-90s had a cafeteria run by an older Turkish woman (I cannot for the life of me remember her name, but I remember her food). She was an amazing cook and introduced me to all sorts of food a naïve girl from the Southern Arizona desert otherwise may never have encountered.

    Wednesdays were my favorite lunch days. Our cafeteria chef made what she simply called "Aubergine," which means "eggplant" in German. It was a magical stuffed-eggplant dish.

    At that time in my life, I was just on the brink of my adventurous culinary journey, so I didn't have the experience to figure out exactly how she made it (and she would never tell). Hence, I've never quite been able to re-create it. Until page 7 of the May issue of Saveur. Right there on the contents page was a photo of that very dish — Karniyarik, as it turns out, which literally translates from Turkish to English as "split belly" (perhaps why she called it "eggplant").

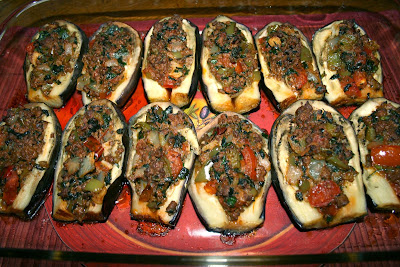
    Of course, I leapt into action and made the dish immediately. The recipe was perfect — it even used enough garlic; that never happens. The only thing I would suggest perhaps is adding another fresh tomato or two into the stuffing mixture. Also, I couldn't find Japanese eggplants, and the Chinese eggplants were too skinny for stuffing. I used small, plump baby eggplants, and it worked perfectly.

    This recipe is quick (you could make it on a week night if you didn't go to the gym after work) and fabulously delicious. Even if you're not a huge fan of lamb, give this one a try. It's very accessible.

    Their dish (May 2009, Saveur, photo by Andre Baranowski):


    My dish:


    Equipment needed:
    • large skillet
    • chopping tools of your choice
    • large chef knife to halve the eggplants
    • 9" x 13" glass baking dish

    Ingredients:
    • Canola oil, for frying (because it can get really, really hot without smoking)
    • 6 plump Japanese eggplants, ends trimmed
    • 4 tbsp. unsalted butter
    • 1 lb. ground lamb
    • 1 tbsp. tomato paste
    • 1⁄2 tsp. ground cinnamon
    • 6 cloves garlic, thinly sliced
    • 1 small yellow onion, roughly chopped
    • 1⁄2 green bell pepper, cored, seeded, and finely chopped
    • 2 medium tomatoes, cored and finely chopped
    • 1⁄2 cup chopped flat-leaf parsley
    • 1⁄4 cup chopped mint leaves
    • Kosher salt and freshly ground black pepper, to taste

    What to do:
    • Add about 1/2-inch canola oil to a large skillet. Heat until shiny and very hot. Add three eggplants (whole with ends trimmed, don't halve them yet), turning every few moments and cook until just soft (about 8 minutes - be very careful not to over cook). Transfer eggplants to paper towel to drain and cool; repeat with the remaining three eggplants. Discard this oil and wipe out skillet.
    • Melt the butter in the skillet over medium-high heat. Add the ground lamb and break into small pieces and brown. Add the tomato paste, cinnamon, garlic, onions and peppers. Stir and cook until onions are soft. Stir in the parsely and mint until wilted and season with salt and pepper.
    • Eggplants should be cool enough to handle by now.
    • Heat oven to 475°. Cut eggplants in half to make 12 pieces. Cut a small incision down the middle of each piece to make a pocket (use fingers to gently pull apart), being very careful not to cut through to the skin or rip the eggplant. Season each with salt and pepper and spoon lamb mixture into pockets, pressing lightly.
    • Place stuffed eggplants in the 9" x 13" baking dish and bake until hot (5 to 15 minutes, depending on how long the eggplants cooled).
    And, violà! Turkish heaven.

    Friday, April 24, 2009

    Magically Mushroomed Gnocchi

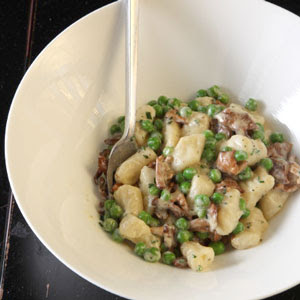
    I have been cooking my way through the April edition of Saveur, which focuses on 12 super fabulous restaurants, each offering up a recipe. Last night I made my version of the Truffled Gnocchi with Peas and Chanterelles, the recipe that was ponied up by the Slanted Door in San Francisco.

    First, I used chanterelles, morels and porcini mushrooms. Chanterelles tend to be on the chewier, tough side (but delicious), so I thought a couple softer mushroom types mixed in would balance out the texture. Worked pretty well. Also, I used dried mushrooms and reconstituted them — cheaper and easier to find, and you get to keep the left-over mushroom water for future soups or rice dishes (if you throw this out, I think the culinary police arrest you and eat your children and pets).

    Second, I used spinach instead of peas. With all the woody, earthy taste I added with the morels and porcinis, I thought it sounded more appropriate. I just saw a comment on the Saveur Web site by a reader who said she used asparagus tips. Genius. I'm going to try that next time.

    Thirdly, I added garlic. Mushroom cream sauce without garlic should be a punishable offense, but if you don't happen to like garlic and want to exclude it, no worries. The chef at Slanted Door didn't use it either.

    Also, the magazine thinks I should make the gnocchi from scratch. Life is far too short for that kind of absurdity. You can buy vacuum sealed gnocchi almost anywhere. I bought mine at Trader Joe's — the ingredient list was all food, no chemicals, so it's just like making it myself, right? The only problem with this blatant cheating is the the "truffled" part of the recipe occurs when you make the gnocchi with truffle oil. I MacGyvered this by drizzling truffle oil over the cooked gnocchi before adding the mushroom sauce. Seemed to work pretty well.

    This is the Slanted Door dish (Saveur, April 2009; photo by Andre Baranowski):


    This is mine (clearly, I used more mushrooms, yum):


    Here's the equipment you'll need:

    A big pot to boil the gnocchi
    A small pot to reconstitute the mushrooms
    A 12" skillet or similar high-sided pan to make the sauce
    Sharp chopping knife or cheater machine
    Slotted spoon
    Stirring spoon

    Ingredients:

    Gnocchi — I bought two 17.6-ounce packages and doubled the sauce recipe.
    Truffle oil to drizzle

    Sauce:
    2 tbsp. extra-virgin olive oil
    10 oz. mushrooms, preferably chanterelles, roughly chopped (or a blend of your choice)
    2 cups heavy cream
    3⁄4 cup peas, fresh or frozen (or any veggie that sounds good to you)
    2 tsp. finely chopped fresh thyme
    Kosher salt and freshly ground black pepper, to taste
    1 tbsp. finely chopped chives
    1 to 3 garlic bulbs, finely chopped

    What to do:
    Reconstitute the mushrooms in as little warm water as possible - just enough to not quite cover them.
    Drain mushrooms (save the mushroom water!)
    Bring a large pot of salted water to a boil.
    While that's heating up, heat olive oil in a 12" skillet over medium-high heat.
    Add mushrooms to skillet and cook, stirring occasionally, until light brown, about 5 minutes.
    Raise heat to high and add cream, the veggie you chose, thyme and garlic.
    Cook, stirring occasionally, until cream reduces by half.
    Season with salt and pepper and remove skillet from heat.
    Add the gnocchi to the boiling water and cook until they float, about 2 minutes.
    Use a slotted spoon to transfer gnocchi to plates
    Drizzle truffle oil over gnocchi
    Cover gnocchi with mushroom sauce
    Add chives and toss to combine

    Wear a chef hat when you make this. The recipe is very easy, but the resulting dish will make you feel like you might really have a chance at winning Top Chef.

    Wednesday, April 22, 2009

    F*ck Yeah, Frittata

    If you can handle cracking open some eggs, chopping up some ingredients, and you have the following:
    • deep sided pan about 12" in diameter
    • oven with working cooktop and broiler

    Then you can make a frittata. 

    It's basically scrambled eggs with stuff in them but without the having to scramble part. It's seriously easy.

    This is my adaptation of a Better Homes and Gardens recipe (I was getting something less geriatric and suburban but it went away ... thanks recession. Thanks a lot. And I want my Domino back as well. Thanks.)

    I call it the "F*ck Yeah, Frittata" because it ACTUALLY turned out magnificent and was easy. Can you make a frittata? F*ck yeah!

    Theirs. (BHG, May 2009)

    Mine.

    Here's the full equipment list:
    • bowl for egg mixture
    • chopping device (those who are skilled can use a real knife. I have one that does it for me)
    • cutting board (don't mess up ma's counters!)
    • high-sided pan suitable for top and inside stove use
    • spatula or other flipping lever
    • oven
    • whisk
    • pie server
    • vegetable peeler

    Ingredient list
    • 8 eggs
    • water
    • salt and pepper to season
    • 1/4 cup finely diced onion (more if you like onions, less if you don't)
    • 1/2 cup cilantro (if you don't like cilantro, use parsley or, say, bacon)
    • Olive oil for greasing up pan
    • shredded cheese mixture (enough to cover top of frittata in sin)
    • Parmesan
    • extra cilantro for sprinkling around like a chef
    • carrot (BHG added this. They also tossed on some edamame--not sure either is important though the orange of the carrot was pretty).

    What you do:
    • Turn on the broiler
    • Before it gets too hot, remember to set your rack in the middle of oven
    • Heat up the pan at medium heat with olive oil on the stove
    • Whisk up the eggs with water then add onions and cilantro (or bacon)
    • Pour mixture into pan
    • Let the eggs set up, occasionally lifting the sides of the egg to let the goo flow underneath and cook up
    • When mostly cooked, stick pan under broiler to finish off top
    • When top looks not lethal, pull out pan and put the cheese layer on top
    • Put pan back under broiler to melt the cheese
    • Take out pan
    • Use oven mitts because formerly harmless handles are now murder weapons
    • Hack the frittata into pizza-shaped wedges
    • Using the pie server, take out wedges and artfully arrange them on a plate
    • Put some carrot and LOTS of Parmesan shavings on top (carrot peeler worked great for both)
    • Yell at your family to come eat before their eggs get cold. Watch their faces of joy when the realize you MADE dinner and didn't just whip up stupid eggs. Or not. My spouse just said, "Wow." And then ate them with gusto. I don't think he liked the carrot peel garnish, though hard to tell when EVERYTHING will go in that maw without much comment.
    As you can see, this recipe is pretty easy. It's messy. But if you did the cooking, you shouldn't have to do the cleaning so don't worry about it. I think this concept of throwing things into eggs and then baking them is going to be big in my house. Leftover chicken? Frittata. Olives and feta? Frittata. Wrinkly sad cherry tomatoes from last week? Frittata.

    If you have some awesome variations on this that you love, please leave them in the comments!